If you can’t already tell, I LOVE my crock pot. There is nothing better than throwing a bunch of ingredients into your slow cooker in the morning and then coming home hours later with dinner cooked and a delicious aroma in the air. I don’t know if my parents have ever given me a more practical gift, and it continues to deliver with this dinner option. This recipe is super easy, super tasty, and it smells like my childhood; I definitely remember my mom making chicken pot pie when I was growing up, and unfortunately, it’s something I hardly ever have as an adult. Not to worry though, with this recipe we discovered last summer, that has changed!
CROCK POT CHICKEN POT PIE
INGREDIENTS
4 Potatoes, Peeled and Cut into Bite Sized Pieces
1.5 Cups Baby Carrots, Cut into Halves
1/2 Onion, Diced
1 tsp Minced Garlic
1/2 tsp Salt
Pepper to Taste
2 Boneless, Skinless Chicken Breasts, Cut into Bite Sized Pieces
2 Cans Cream of Chicken Soup
1 Cup Frozen Peas
Biscuits, Toast, or Pie Crust
Flour or Cornstarch for Thickening
DIRECTIONS
1.) Place all of the veggies into the crockpot and sprinkle with salt and pepper.
2.) Place chicken ontop of veggies and cover with soup. Cover and cook on LOW for 4-5 hours.
3.) Add frozen peas and cook for 20 more minutes. If the ingredients seem a little runny, add either cornstarch or flour to thicken it to the desired consistency.
4.) Serve over biscuits, toast, or pie crust.
Just in case you need a little Pin-spiration, here's the link to my Pinterest Boards: http://pinterest.com/stardustbabey/boards/
Friday, October 11, 2013
Tuesday, September 24, 2013
Recipe: Slow Cooked Mac & Cheese
Slow cooking macaroni and cheese in a crock pot is a strange concept, and it seems like every time I mention this recipe to people they think I've lost my mind by trying to destroy this amazing comfort food. I mean, really, how exactly does heating milk and cheese to over 150 degrees for several hours result in an edible dish? I don't know, but I promise you that the end result is super tasty. Also, I know what you're thinking, but gluten free pasta works just as well with this recipe as regular pasta; therefore, I am not slowly poisoning my future husband with the natural proteins found in grains. In fact, K was super excited last time I made this, which means it's a big hit; and I know that I love this recipe too because it's more than simply cheese and pasta.
So my hungry friends, go dig out that slow cooker from the pantry or cabinet where you keep it, embrace the oddity of slow cooking mac and cheese, and get to cooking!
SLOW COOKED MAC & CHEESE
INGREDIENTS
1.5 cup Milk
2 Large Eggs
1 can (12 oz) Evaporated Milk (this prevents the milk and egg from curdling in the slow cooker)
1/4 cup (1/2 stick) Unsalted Butter, melted
2 cups Sharp Cheddar Cheese
1 cup Mozzarella Cheese
1/2 cup Grated Parmesan Cheese
1/2 lbs Macaroni
1/2 tsp Paprika
2 tsp Italian Seasoning (I simply use Thyme, Oregano, and Basil)
Salt and Back Pepper to taste
DIRECTIONS
1.) Cook pasta for about five minutes and drain
2.) Spray or grease the inside of your crock pot, then combine the milk, evaporated milk, eggs, butter, and salt. Whisk until smooth.
3.) Add the pasta, Pepper, Paprika, Italian seasoning, and shredded cheese (NOT the Parmesan Cheese) Stir gently to mix.
4.) Sprinkle the Parmesan on top. Cover and cook on HIGH for 30 minutes. Then, turn slow cooker to LOW and cook for an additional 2.5 hours.
5.) Serve hot (Top with bread crumbs to make it a little fancier)
Just in case you need a little Pin-spiration, here's the link to my Pinterest Boards: http://pinterest.com/stardustbabey/boards/
So my hungry friends, go dig out that slow cooker from the pantry or cabinet where you keep it, embrace the oddity of slow cooking mac and cheese, and get to cooking!
SLOW COOKED MAC & CHEESE
INGREDIENTS
1.5 cup Milk
2 Large Eggs
1 can (12 oz) Evaporated Milk (this prevents the milk and egg from curdling in the slow cooker)
1/4 cup (1/2 stick) Unsalted Butter, melted
2 cups Sharp Cheddar Cheese
1 cup Mozzarella Cheese
1/2 cup Grated Parmesan Cheese
1/2 lbs Macaroni
1/2 tsp Paprika
2 tsp Italian Seasoning (I simply use Thyme, Oregano, and Basil)
Salt and Back Pepper to taste
DIRECTIONS
1.) Cook pasta for about five minutes and drain
2.) Spray or grease the inside of your crock pot, then combine the milk, evaporated milk, eggs, butter, and salt. Whisk until smooth.
3.) Add the pasta, Pepper, Paprika, Italian seasoning, and shredded cheese (NOT the Parmesan Cheese) Stir gently to mix.
4.) Sprinkle the Parmesan on top. Cover and cook on HIGH for 30 minutes. Then, turn slow cooker to LOW and cook for an additional 2.5 hours.
5.) Serve hot (Top with bread crumbs to make it a little fancier)
Just in case you need a little Pin-spiration, here's the link to my Pinterest Boards: http://pinterest.com/stardustbabey/boards/
Wednesday, August 28, 2013
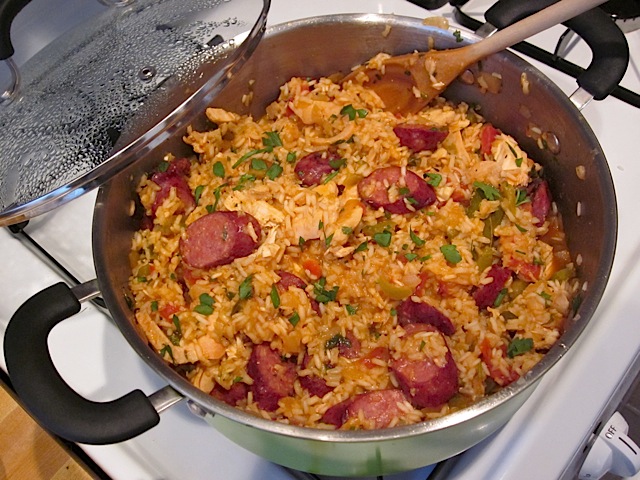
Recipe: Jambalaya
Probably our absolute FAVORITE discovery last summer was this jambalaya recipe. It's easily tailored for those with the very mild taste buds (which is what we have here at our home) to those that want a fire burning kick. Although, relatively simple, we discovered that for people out in the West coast, it's a little bit more complicated to make since grocery stores don't seem to carry the frozen vegetable blend the original recipe recommends. Nonetheless, this delicious dish is too good not to share; especially after our trip to New Orleans last month!
JAMBALAYA
INGREDIENTS
2-4 Chicken Breasts
1 lbs Sausage (K and I like to use either sweet or Italian)
1 Can (15 oz) Diced Tomatoes (Undrained)
4 tsp Minced Garlic
1/4-1 tsp Red Pepper Flakes (We use 1/4 tsp and it gives us just the kick we need, but if you like your jambalaya spicy, use closer to a full tsp)
1/4 tsp Paprika
1/2 tsp Thyme
1/4 tsp Cilantro (Fresh or dried)
Salt and Pepper to taste
2.5 tbsp Tomato Paste
3.5 cups Water
2 cups of Rice
12 oz Pictsweet Frozen Seasoning Mix ***
DIRECTIONS
1.) Slice sausage and chicken and cook in a large pot over medium heat until thoroughly cooked (about 5 minutes). Remove the cooked meat.
2.) Add the onion, bell pepper, celery, and garlic to pot and cook in the meat drippings remaining in the pot until soft (3-5 min).
3.) Add dry rice, red pepper flakes, paprika, and tomato past. Stir together and cook for 1 min.
4.) Add 3.5 cups of water, diced tomatoes, thyme, pepper, and salt.
5.) Add the meat back to pot. Bring to a simmer, add lid, and reduce heat to low. Let sit for 30 min. Stir in cilantro and serve.
Just in case you need a little Pin-spiration, here's the link to my Pinterest Boards: http://pinterest.com/stardustbabey/boards/
JAMBALAYA
INGREDIENTS
2-4 Chicken Breasts
1 lbs Sausage (K and I like to use either sweet or Italian)
1 Can (15 oz) Diced Tomatoes (Undrained)
4 tsp Minced Garlic
1/4-1 tsp Red Pepper Flakes (We use 1/4 tsp and it gives us just the kick we need, but if you like your jambalaya spicy, use closer to a full tsp)
1/4 tsp Paprika
1/2 tsp Thyme
1/4 tsp Cilantro (Fresh or dried)
Salt and Pepper to taste
2.5 tbsp Tomato Paste
3.5 cups Water
2 cups of Rice
12 oz Pictsweet Frozen Seasoning Mix ***
***This Pictsweet onion, bell pepper, and celery blend is a lifesaver. Of course, if you can't find this in the frozen vegetable section (or something similar), you can use a 1/2 cup of chopped onion, 1/2 cup of chopped bell pepper, and 1/2 cup chopped celery instead.
DIRECTIONS
1.) Slice sausage and chicken and cook in a large pot over medium heat until thoroughly cooked (about 5 minutes). Remove the cooked meat.
2.) Add the onion, bell pepper, celery, and garlic to pot and cook in the meat drippings remaining in the pot until soft (3-5 min).
3.) Add dry rice, red pepper flakes, paprika, and tomato past. Stir together and cook for 1 min.
4.) Add 3.5 cups of water, diced tomatoes, thyme, pepper, and salt.
5.) Add the meat back to pot. Bring to a simmer, add lid, and reduce heat to low. Let sit for 30 min. Stir in cilantro and serve.
![]() |
![]() |
Just in case you need a little Pin-spiration, here's the link to my Pinterest Boards: http://pinterest.com/stardustbabey/boards/
Sunday, August 18, 2013
Recipe(s): Slow Cooked Cheesy Chicken and Rice & Triple Chocolate Chunk Muffins
Despite having the last 3 weeks off from school, I somehow managed to not write a single blog post (I did have two separate weekend get-a-ways to Louisiana and California during that time, but more on that later); does that make me a failed blogger? Let's hope not... I mean, better late than never, right? To make up for my nearly month-long hiatus I am gonna give you DOUBLE the pinterest-approved recipes. Surely dinner and dessert will leave your belly happy?!
So ladies and gents, I hope you are hungry, because today I bring you (...drum roll please...) Slow Cooked Cheesy Chicken and Rice for your main course and Triple Chocolate Chunk Muffins for that sweet tooth! And since they are muffins they also make a good breakfast to-go, especially since they are high in protein and (if you make them with Stevia) low in sugar.
These two recipes are a big hit at our place, because they are both gluten free! Any time we find tasty GF items, we can't help but celebrate. Luckily, the gluten free diet fad has made buying products almost too easy, but cooking and baking from recipes are still sometimes a chore. But fear not my gluten and gluten free eaters, everyone is sure to love both of these recipes!
SLOW COOKED CHEESY CHICKEN AND RICE
INGREDIENTS
2 to 4 Boneless, Skinless Chicken Breasts
1/2 Large Chopped Onion
1 (8 oz) Box of Zatarain's Yellow Rice Mix (cooked according to directions on box)
1.5 cups Shredded Sharp Cheddar Cheese
1 (10.5 oz) can Cream of Chicken Soup
1 (15 oz) can Whole Kernel Corn (drained)
DIRECTIONS
1.) Chop 1/2 of a large onion.
2.) Place chicken in bottom of slow cooker. Scatter chopped onion over top. Spoon the cream of chicken soup over top of that. Cover and cook on low for 7-8 hours or on high for 3-4 hours.
3.) Cook rice following the directions on the box.***
4.) A few minutes before serving, add in cooked rice, drained corn, and the cheese. Stir to combine. Serve hot.
***The rice takes a little over 30 minutes to prepare, so cooking it in advance is both helpful and preferred.
TRIPLE CHOCOLATE CHUNK MUFFINS
INGREDIENTS
1 3/4 c Oats
3 Egg Whites
3/4 c Unsweetened Cocoa
1/2 c Unsweetened Apple Sauce
1 tsp Vanilla Extract
1/2 c Plain Greek Yogurt (or regular plain low fat yogurt)
1/2 tsp Cream of Tartar (or 2 tsp vinegar)
1 1/2 tsp Baking Powder
1 1/2 tsp Baking Soda
1/4 tsp Salt
1 c Hot Water
1/2 c Sugar (or sugar substitute like Stevia or sweetener of choice that measures like sugar)
1/2 c Semi-Sweet Chocolate Chips
12 to 24 Foil Cupcake Liners or Non-stick Cooking Spray***
***Paper liners tend to stick to muffins, so splurge on the foil ones. Of course, you can skip the liners all together and just spray the muffin tin.
DIRECTIONS
1.) Preheat oven to 350 degrees. Line a 12-cup muffin pan with foil cupcake liners, or spray muffin tin with non-stick cooking spray. Set aside.
2.) In a blender, (or food processor), mix all of the ingredients together, except for the chocolate chips. Blend until oats are ground and mixture is smooth. ***
3.) Add the chocolate chips to the batter and stir in by hand.
4.) Fill muffin liners about 3/4 full. Bake for 12-15 min, or until tooth pick comes out clean.
5.) Cool muffins before removing from pan, and enjoy.
***The batter will be fairly liquidy, but I promise that the muffins will turn out just fine.
Just in case you need a little Pin-spiration, here's the link to my Pinterest Boards: http://pinterest.com/stardustbabey/boards/
So ladies and gents, I hope you are hungry, because today I bring you (...drum roll please...) Slow Cooked Cheesy Chicken and Rice for your main course and Triple Chocolate Chunk Muffins for that sweet tooth! And since they are muffins they also make a good breakfast to-go, especially since they are high in protein and (if you make them with Stevia) low in sugar.
SLOW COOKED CHEESY CHICKEN AND RICE
INGREDIENTS
2 to 4 Boneless, Skinless Chicken Breasts
1/2 Large Chopped Onion
1 (8 oz) Box of Zatarain's Yellow Rice Mix (cooked according to directions on box)
1.5 cups Shredded Sharp Cheddar Cheese
1 (10.5 oz) can Cream of Chicken Soup
1 (15 oz) can Whole Kernel Corn (drained)
DIRECTIONS
1.) Chop 1/2 of a large onion.
2.) Place chicken in bottom of slow cooker. Scatter chopped onion over top. Spoon the cream of chicken soup over top of that. Cover and cook on low for 7-8 hours or on high for 3-4 hours.
3.) Cook rice following the directions on the box.***
4.) A few minutes before serving, add in cooked rice, drained corn, and the cheese. Stir to combine. Serve hot.
***The rice takes a little over 30 minutes to prepare, so cooking it in advance is both helpful and preferred.
TRIPLE CHOCOLATE CHUNK MUFFINS
INGREDIENTS
1 3/4 c Oats
3 Egg Whites
3/4 c Unsweetened Cocoa
1/2 c Unsweetened Apple Sauce
1 tsp Vanilla Extract
1/2 c Plain Greek Yogurt (or regular plain low fat yogurt)
1/2 tsp Cream of Tartar (or 2 tsp vinegar)
1 1/2 tsp Baking Powder
1 1/2 tsp Baking Soda
1/4 tsp Salt
1 c Hot Water
1/2 c Sugar (or sugar substitute like Stevia or sweetener of choice that measures like sugar)
1/2 c Semi-Sweet Chocolate Chips
12 to 24 Foil Cupcake Liners or Non-stick Cooking Spray***
***Paper liners tend to stick to muffins, so splurge on the foil ones. Of course, you can skip the liners all together and just spray the muffin tin.
DIRECTIONS
1.) Preheat oven to 350 degrees. Line a 12-cup muffin pan with foil cupcake liners, or spray muffin tin with non-stick cooking spray. Set aside.
2.) In a blender, (or food processor), mix all of the ingredients together, except for the chocolate chips. Blend until oats are ground and mixture is smooth. ***
3.) Add the chocolate chips to the batter and stir in by hand.
4.) Fill muffin liners about 3/4 full. Bake for 12-15 min, or until tooth pick comes out clean.
5.) Cool muffins before removing from pan, and enjoy.
***The batter will be fairly liquidy, but I promise that the muffins will turn out just fine.
Just in case you need a little Pin-spiration, here's the link to my Pinterest Boards: http://pinterest.com/stardustbabey/boards/
Wednesday, July 17, 2013
Recipe: Chicken and Black Bean Enchilada Casserole
When I joined Pinterest, I was one of those girls that could browse boards and pins for days. I think the website is fantastic- it allows me to meticulously organize items that catch my eye, link to websites with instructions, get inspiration from friends, and feed my curiosities belly. Luckily, K also enjoys food, so during the 3 years we spent together at ASU we found a way to make cooking a shared hobby and a way to spend time together. Just over a year ago, when K and I moved into our place together, we felt it seemed fitting to continue the tradition of sharing each other's company and skills in the kitchen; that's how we ended up trying a new recipe EVERY week last summer, as a way to both feed our curiosities, and our bellies. It was simply a coincidence that my recent Pinterest addiction corresponded to the new chapter in our lives, but it was certainly helpful that we were allowed easy access to an endless supply of new recipes!
Last summer, K and I tried new recipes (and a decent number have found a permanent place in our culinary repertoire), so I've decided that this summer I'll share the ones that worked for us. For starters, I'm gonna share one of our new favorite, and easy Mexican food recipes. I want to warn you that if you check this recipe on Pinterest, we did modify it just slightly; neither of us does spicey food, so if you want some heat, you'll have to refer to the original recipe on my "Happy Tummy" board. Nonetheless... ¡Buen Provecho!
CHICKEN AND BLACK BEAN ENCHILADA CASSEROLE
INGREDIENTS
2 cups Shredded Chicken Breast Meat (for extra lazy days, use a rotisserie chicken)
3/4 tsp Ground Cumin
2 tbsp Cilantro (fresh or dried)
1/2 tsp Minced Garlic
1 (15 oz) can Black Beans
1 (10 oz) can Red Enchilada Sauce
8 Corn Tortillas
2 cups Shredded Mexican Cheese Blend
1 (8 oz) Container Sour Cream
DIRECTIONS
1.) Preheat the oven to 375°. Heat a large skillet over medium heat, and spray with vegetable cooking spray. Sauté chicken with cumin and garlic until chicken is cooked through. Transfer to a medium bowl. Stir in the cilantro and black beans.
2.) Spread half of the enchilada sauce over the bottom of an 9X11 inch baking pan that has been sprayed with cooking spray (just a little hint, I put foil on the bottom of the pan and skip the greasing). Place 4 tortillas over the sauce, overlapping if necessary. Spoon half of the chicken/bean mixture over the tortillas, and sprinkle with half of the cheese and half of the sour cream.
3.) Spoon the remaining enchilada sauce over the cheese, and make another layer of tortillas. Layer the remaining chicken/bean mixture over the tortillas.
4.) Cover dish with aluminum foil. Bake for 30 minutes in the preheated oven.
5.) Remove the cover, and sprinkle the remaining cheese over the top and dot with sour cream. Continue cooking, uncovered, for an additional 5 to 10 minutes, or until cheese melts.
6.) Let stand 10 minutes before serving.
Just in case you need a little Pin-spiration, here's the link to my Pinterest Boards: http://pinterest.com/stardustbabey/boards/
![]() |
![]() |
K grilling and me cooking
Last summer, K and I tried new recipes (and a decent number have found a permanent place in our culinary repertoire), so I've decided that this summer I'll share the ones that worked for us. For starters, I'm gonna share one of our new favorite, and easy Mexican food recipes. I want to warn you that if you check this recipe on Pinterest, we did modify it just slightly; neither of us does spicey food, so if you want some heat, you'll have to refer to the original recipe on my "Happy Tummy" board. Nonetheless... ¡Buen Provecho!
CHICKEN AND BLACK BEAN ENCHILADA CASSEROLE
INGREDIENTS
2 cups Shredded Chicken Breast Meat (for extra lazy days, use a rotisserie chicken)
3/4 tsp Ground Cumin
2 tbsp Cilantro (fresh or dried)
1/2 tsp Minced Garlic
1 (15 oz) can Black Beans
1 (10 oz) can Red Enchilada Sauce
8 Corn Tortillas
2 cups Shredded Mexican Cheese Blend
1 (8 oz) Container Sour Cream
DIRECTIONS
1.) Preheat the oven to 375°. Heat a large skillet over medium heat, and spray with vegetable cooking spray. Sauté chicken with cumin and garlic until chicken is cooked through. Transfer to a medium bowl. Stir in the cilantro and black beans.
2.) Spread half of the enchilada sauce over the bottom of an 9X11 inch baking pan that has been sprayed with cooking spray (just a little hint, I put foil on the bottom of the pan and skip the greasing). Place 4 tortillas over the sauce, overlapping if necessary. Spoon half of the chicken/bean mixture over the tortillas, and sprinkle with half of the cheese and half of the sour cream.
3.) Spoon the remaining enchilada sauce over the cheese, and make another layer of tortillas. Layer the remaining chicken/bean mixture over the tortillas.
4.) Cover dish with aluminum foil. Bake for 30 minutes in the preheated oven.
5.) Remove the cover, and sprinkle the remaining cheese over the top and dot with sour cream. Continue cooking, uncovered, for an additional 5 to 10 minutes, or until cheese melts.
6.) Let stand 10 minutes before serving.
Just in case you need a little Pin-spiration, here's the link to my Pinterest Boards: http://pinterest.com/stardustbabey/boards/
Tuesday, June 18, 2013
Summer "Break" & D3 Life
It's been a tough journey thus far. There were days D1 year, when I would come home, lay on the ground in my living room, and cry. The first year of dental school is unlike anything I've ever experienced, and there's no good way to really understand it unless you've done it or are going through it. The only solace of first year is the knowledge that your dental school friends/family are suffering as much as you are, and the reminder that every dentist before you has gone through the same hell. Depending on who you talk to, D2 year is just more of the same. Lucky for me, second year was not terrible. Yes, there was a ton of lab work and still quizzes/exams/etc, but it was so much more manageable. When the clock stuck 5PM, I got to go home, and on the weekends, I even got to have some fun (I mean, I was able to adopt a dog and start planning a wedding second year)! Like I said before though, I was kind of lucky- I was never behind on lab work, and an average of 2 quizzes/exams/etc was a lot easier to budget time for than the never ending stream of studying required for first year.
My parents and I during "Family Day" first year. So grateful for their love and support during dental school and the many years before, while I was working towards my dream of one day attending BCD.
To try and put dental school into perspective for any non-dental readers, there's an analogy floating around the halls of Baylor that dental school is like learning to jump through hoops; the first year it's a hoop of fire, second year it's a hoop covered in barbed wire, third year there's another dangerous hoop, followed by yet another (for posterity's sake, I'm sure) for fourth year. Somehow though, we all end up safely on the other side, degree in hand, ready to add those three little letters to the end of our names, and our wounds fading to scars. Poetic, isn't it?
Unlike last summer, which despite doing summer research was pretty lazy, there's not really a summer break between 2nd and 3rd year. Jokingly referred to as "sophomore summer" by the clinic faculty, this summer comes complete with both summer classes (exams included) and patients (with "on-the-job" training on how the clinic runs and how to work the school's computer system). Its seems to be going pretty fast though; we're already on the 3rd of the 6 week summer school program! Truthfully though, it hadn't been that busy until yesterday. Monday was one of those go-go-go days; I had class for 2 hrs in the morning, followed by back-to-back patients at 10AM and 1PM (to make matters worse, the 1PM patient was a surprise when I checked my schedule at 1:10PM after cleaning up from my morning patient), which meant I didn't get home until 5:30PM after doing some lab work. Not only did I not get to eat lunch, but I didn't get to pee until my second patient left- my poor bladder! Even though I was at school the same amount of time I am during the normal school year, running around clinic and interacting with patients is a lot more exhausting than sitting on your butt in a lecture hall.
D2 year, among other things, K and I found time to carve pumpkins (or a watermelon in his case), go to the State Fair of Texas, and attend Holiday Gala (aka Dental Prom)
This summer isn't all bad. Baylor does give us a 2 week break after finals before summer clinic starts and 4 more weeks after it ends before school starts in August. And really, it's much appreciated! The first 2 week break has long come and gone, but I did fill that time with a visit to my old high school to give a 2 hour presentation to the clinical rotations classes on how to apply to dental school and what life is like once you're in it (I promise I was upfront about how first year makes you question why you wished such torture on yourself. Regardless, those kids won't truly get it unless they all go to dental school). There was even enough time for K and I to make our way around the LA/Burbank area to not only tour venues, but to even put down money to reserve one! Our official wedding date is now Friday, May 30, 2014. Everyone should request off from work and start saving money now!!!
Congratulations to Mr. & Mrs. Lucas on their recent nuptials!
As a woman in the middle of planning her own wedding, I don't want to sound biased, but weddings are a lot of fun! This past weekend, K, 3 of our friends, and I all piled into K's Toyota Corolla and headed up to OKC for our college friend's wedding (FYI weddings are a totally different experience when you're planning one!). It was a short 24 hour stay, but we loved seeing people we hadn't seen in awhile, and the chance to eat, drink, and dance the night away! Sunday morning before we headed back to Dallas, we made a point to go to the Oklahoma City Bombing Memorial. It was a very somber way to end a joyous weekend, but it was very moving. I have vivid memories of the news showing the building after the explosion, and firefighters carrying a young African American child from the blast zone as she cried and blood ran down her face. Despite that, I almost feel that the visit was more powerful to K and our friends since none of them grew up in Texas or the surrounding states, and were therefore not as familiar with the bombing as I am.
On a lighter note, with only 3 more weeks of summer clinic left, K and I will be headed to New Orleans towards the end of July for a mini-vacation, and then back out to California the first week of August for his cousin's wedding. I guess wedding season really has arrived!
Thursday, April 25, 2013
Dress, Dog, & (Almost) Doctor
Whenever anyone asks how wedding planning is going, I find myself answering the same way I did last year when people asked about the first year of dental school: ...It's going. Of course, last year the reason behind the cryptic response was to spare friends and family of how dental school was a torturous black hole of perpetual sorrow; now-a-days, its to keep myself from feeling like I'm somehow behind on the planning front.
Normally, I love lists- they're a perfect way to keep things organized, but somehow those ever so handy month-by-month wedding planning check lists freak me out. It's probably for one of two reasons: 1.) There are some BIG items to take care of up ahead, and 2.) I have barely made a dent in the million and one things that are required to plan a wedding (in reality, I'm probably freaked out because of both reasons). I am happy to announce though, that I have marked off a very large item from the "To-Do List." Ladies and gentlemen, I have found THE dress! The picture to the left is a sneak preview of what we'll look like in 12-14 months- K in a suit, and me in my wedding gown! We've also officially booked our flight to CA for the end of May so that we can look at venues... and reserve one of course. Thankfully the internet has allowed us to browse potential locations with our fingertips!
The same day I got measured for my dress, K and I brought home our new baby. We now have a beautiful, blonde, brown eyed, 42 lbs, 2 year old Shar Pei/Lab Mix named Rosalind- in honor of Rosalind Franklin. You know we're a a nerdy couple when we name our dog (and all future pets) after a famous scientist.
Rosalind is such a sweetheart. I fell in love with her while volunteering at the SPCA in Dallas, and she won my heart. She didn't have to try very hard to win over K's either. She loves belly rubs, cuddling on the couch with mommy, playing tug-of-war with daddy, giving kisses, and running around with other dogs. She came to us knowing 'sit' and 'down,' and that little smarty pants has already learned 'shake,' 'roll over,' and 'bang!' Unfortunately, our little four legged child is also a tad bit destructive. In the 18 days we've had her she's destroyed: 8 Harry Potter DVD cases and 4 Harry Potter DVDs, 2 rubber coasters, 1 flip flop, and 1 TV remote. Ugh. Apparently she's a chewer, and we REALLY wish we'd known ahead of time that we needed to stock-up on durable, dog-appropriate chew toys. Being a new parent is so charming... She sure is cute though; I mean, look at that face and those floppy ears!
(Let me just get on my soap box real quick... shame on you if you ever pay money for an animal and it's not from an adoption shelter. Shelter pets are the most loving, the most grateful, and the one's who need us the most. Their lives actually depend on whether or not people go to their local shelter vs their local breeder. Now, if you're looking for a fury friend, check out the North Texas SPCA website to see what animals they currently have up for adoption: http://spcafindapet.com/)
Monday was a big day in my dental education/career. I had my FIRST official patient! It was a hectic afternoon and I am SO grateful that a D3 was able to help me out, otherwise I would have been so lost. The appointment started with me going up to the second floor to retrieve my patient from the waiting room. We then ventured down to the first floor Oral Diagnosis clinic so that I could take his vital signs, go over his medical and dental history, and have him sign a ton of forms. After waiting for my start check, I did his extra-oral and intra-oral exam. I confirmed the findings of his screening appointment and did his treatment plan. My findings were then confirmed by one of the clinic faculty after waiting in line for them to take a look at my patient, and then off we went to the Oral Surgery clinic to wait for a consultation. From there we went back up to the second floor for another exam and consult in the Removable Clinic. After MORE waiting, everything was finally approved. When all was said and done, it only took 2 hours of waiting and bouncing from clinic to clinic before the patient was free to go. I can't believe the time has come for me to finally start treating actual people! I mean, just today I gave 2 injections in the oral surgery clinic on an emergency patient- I'm basically a real dentist! Well, almost....
Normally, I love lists- they're a perfect way to keep things organized, but somehow those ever so handy month-by-month wedding planning check lists freak me out. It's probably for one of two reasons: 1.) There are some BIG items to take care of up ahead, and 2.) I have barely made a dent in the million and one things that are required to plan a wedding (in reality, I'm probably freaked out because of both reasons). I am happy to announce though, that I have marked off a very large item from the "To-Do List." Ladies and gentlemen, I have found THE dress! The picture to the left is a sneak preview of what we'll look like in 12-14 months- K in a suit, and me in my wedding gown! We've also officially booked our flight to CA for the end of May so that we can look at venues... and reserve one of course. Thankfully the internet has allowed us to browse potential locations with our fingertips!
The same day I got measured for my dress, K and I brought home our new baby. We now have a beautiful, blonde, brown eyed, 42 lbs, 2 year old Shar Pei/Lab Mix named Rosalind- in honor of Rosalind Franklin. You know we're a a nerdy couple when we name our dog (and all future pets) after a famous scientist.
Rosalind is such a sweetheart. I fell in love with her while volunteering at the SPCA in Dallas, and she won my heart. She didn't have to try very hard to win over K's either. She loves belly rubs, cuddling on the couch with mommy, playing tug-of-war with daddy, giving kisses, and running around with other dogs. She came to us knowing 'sit' and 'down,' and that little smarty pants has already learned 'shake,' 'roll over,' and 'bang!' Unfortunately, our little four legged child is also a tad bit destructive. In the 18 days we've had her she's destroyed: 8 Harry Potter DVD cases and 4 Harry Potter DVDs, 2 rubber coasters, 1 flip flop, and 1 TV remote. Ugh. Apparently she's a chewer, and we REALLY wish we'd known ahead of time that we needed to stock-up on durable, dog-appropriate chew toys. Being a new parent is so charming... She sure is cute though; I mean, look at that face and those floppy ears! (Let me just get on my soap box real quick... shame on you if you ever pay money for an animal and it's not from an adoption shelter. Shelter pets are the most loving, the most grateful, and the one's who need us the most. Their lives actually depend on whether or not people go to their local shelter vs their local breeder. Now, if you're looking for a fury friend, check out the North Texas SPCA website to see what animals they currently have up for adoption: http://spcafindapet.com/)
Monday was a big day in my dental education/career. I had my FIRST official patient! It was a hectic afternoon and I am SO grateful that a D3 was able to help me out, otherwise I would have been so lost. The appointment started with me going up to the second floor to retrieve my patient from the waiting room. We then ventured down to the first floor Oral Diagnosis clinic so that I could take his vital signs, go over his medical and dental history, and have him sign a ton of forms. After waiting for my start check, I did his extra-oral and intra-oral exam. I confirmed the findings of his screening appointment and did his treatment plan. My findings were then confirmed by one of the clinic faculty after waiting in line for them to take a look at my patient, and then off we went to the Oral Surgery clinic to wait for a consultation. From there we went back up to the second floor for another exam and consult in the Removable Clinic. After MORE waiting, everything was finally approved. When all was said and done, it only took 2 hours of waiting and bouncing from clinic to clinic before the patient was free to go. I can't believe the time has come for me to finally start treating actual people! I mean, just today I gave 2 injections in the oral surgery clinic on an emergency patient- I'm basically a real dentist! Well, almost....
Whether it was a crown prep, a filling, or dentures, my first patient never had much to say. My second, third, and fourth patients received cleanings; the latter didn't feel as comfortable with me wielding sharp instruments as my classmates had. Now, I'm doing exams and treatment plans and giving injections! With some much appreciated help from upper classmen, of course!
Subscribe to:
Posts (Atom)